


Drywall is an integral part of nearly every home, and yet it’s one of the first materials to be damaged when water is present. Whether from a broken pipe, weather damage, or any other unexpected flooding, water can cause drywall to become weak, swell or crumble. This is why you’ll frequently find a discolored, warped, or unsound wall. You should not just ignore it. Having the knowledge of how to fix water damaged drywall is a necessary evil, not only in order to fix the imperfection but also to prevent damage, mold and potentially more costly repairs, In this step-by-step guide, we’re going to cover all you need to know to assess, repair, and finish drywall damaged by water.
Understanding How to Fix Water Damaged Drywall
Water damaged drywall can seriously harm your home’s structure and foundation, as well as lead to mold that poses a serious health hazard. Drywall and sheetrock are porous substances, so they easily soak up moisture. Once that water gets in, a lot of the times it can spread rapidly and you won’t notice it until the damage is already on the surface. Common Causes of Drywall Water Damage
Drywall is susceptible to water damage from a number of common household hazard spots:
- Leaking or burst plumbing pipes
- Roof leaks
- Poorly sealed windows or doors
- Malfunctioning appliances
- Clogged gutters or downspouts
- High indoor humidity or condensation
- Flooding or natural disasters
- Bubbling or peeling paint
The root cause must be found and corrected in order to make a good repair and avoid future damage
Identifying Early Signs Of Water Damaged Drywall
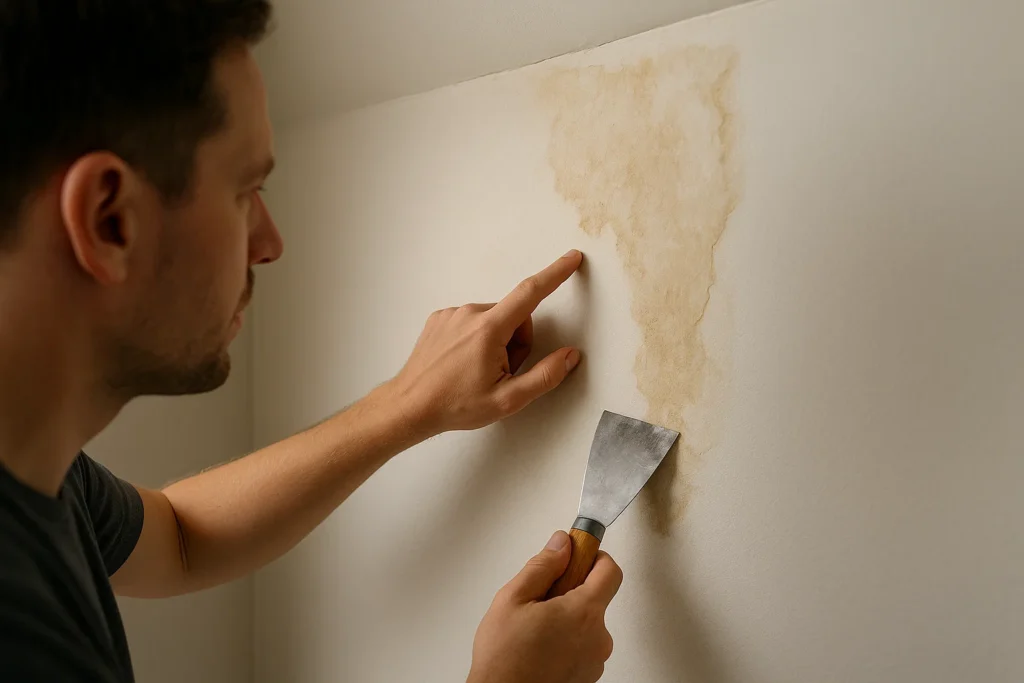
Recognizing damage and taking steps to repair drywall water damage early can prevent you from having to make more serious and expensive repairs later. Early warning signs range from tiny brownish or yellowish spots, to bubbling or peeling paint, to areas of the wall or ceiling that appear to sag, as well as a constant musty smell. In others, damage could be hidden by furniture or in areas that are infrequently used, such as basements or attics. These small hints, particularly following a storm or plumbing problem, can help you get a leg up on the spread of damage.
Assessing the Damage: Is It Repairable?
Before you get to work fixing damage, the first and most important thing you need to know is whether your drywall can actually be saved, or if it will need to be entirely replaced. Not all water damage is the same, small stains or minor bubbling on the surface may only need light repair. For instance, while sagging, moldy or extensively saturated drywall might call for specialized removal. Getting the call right from the start can save time, money and a headache down the road.
Tools and Materials Needed
- Flashlight- to search the dark corners and ceilings
- Moisture Meter to Check for Moisture Behind Drywall
- Screwdriver or Pocket Knife to Test Softness
- Pencil or painter’s tape for marking affected areas
- Gloves and mask (mold in particular)
When to Replace Drywall vs. Repair
Whether you decide to repair or replace drywall, depends on how extensive and how deep the damage is. Small surface problems like stains, peeling paint, minor cracks usually can be addressed simply with patching and repainting. Moreover, if the drywall is soft to touch, is bowing or sports mold, then it’s better to just replace it. In general, if more than 12-16 square inches have become seriously damaged, or if the wall has been soaking with water for over 24-48 hours, replacing may be the safer course of action.
Checking for Mold Growth After Water Damage
Mold is one of the worst threats in the case of water contact. Mold will start to grow on or behind wet drywall within 24 to 48 hours particularly in warm, moist climates. Visual inspection is important, but moldy mold may have been concealed behind walls or under wallpaper. Check for black, green or gray specks, a musty odor or areas of drywall that are peeling. If mold is found, the location should be cleaned and treated with mold-killing agents and aired throughly. For mold that has become widespread, we would very strongly recommend professional remediation before any repairs are attempted.
How to Repair Drywall Damaged by Water
When you’ve determined that damage is fixable, after inspection the next step is to repair in a systematic way. Correct repair will not only make your wall or ceiling look the way it should but also provide structural integrity and block future problems such as mold growth. Although precise repairs might differ based on the extent of the damage, the typical process involves removing damaged and loose material, drying the area out, replacing what’s broken, and refinishing the surface for a seamless, smooth result.
Step 1: Removing Damaged Drywall and Wet Insulation
To repair the damage, first you must remove any wet/damp drywall and insulation in order to prevent mildew and mold growth. The drywall in common wear and tear areas is often damp, crumbly, soft or discolored, and is no longer capable of holding finishes such as paint and joint compound. If insulation behind the wall is wet, it should also be taken out to avoid mold and additional structural damage. This opens the area up for drying and repair.
Step 2: Drying the Location to Prevent Water Damage
When the mold is removed, it’s important that the exposed area, including any studs, the cavities between insulation and the adjacent surfaces, be thoroughly dried. Residual moisture can cause rot and mold, even after the new drywall goes up. Fans, dehumidifiers, and proper ventilation can speed the drying process. You must wait until the entire area is thoroughly dried out before attempting repairs.
Step 3: Replacing Damaged Sheetrock or Drywall
Then once it is dry, new drywall or sheetrock can be measured and cut to fit and command the indecent sections that were removed. It’s essential to have a good fit and securely attached to the studs for stability. Re-installing drywall properly is key to making the patching disappear and for bridging the gap between the new and old areas of the wall or ceiling.
Step 4: Sealing and Patching Holes in Drywall
After new drywall is hung, all of the seams and screw holes must be covered with strips of drywall tape and joint compound. This process guarantees a flat surface and provides extra adhesion to the old and new panels. Even if just a small section was replaced, conducting proper taping and mudding makes the patched area blend with the rest of the wall.
Step 5: Sanding, Priming, and Painting the Repaired Area
Finally, the surface needs to be finished to match the rest of the room. The joint compound will then have to be sanded after letting it dry. Then it’s primed to get the surface ready to be painted. Once we match the paint color and texture, the repair will be barely noticeable, and the restoration is finished.
Fixing Specific Types of Water Damage
Not all drywall water damage is created equal and neither is the plan to repair it. The cause and extent of the water damage will be the major factors that will effect the water damage condition. For instance, damage from a slow plumbing leak may impact just a small area, while a flood can soak inches of drywall on large portions of the wall, necessitating more extensive renovation. Likewise, ceilings can be especially challenging because of gravity and the fact that it is overhead.
How to Fix Wet Drywall from Flooding or Leaks
When drywall becomes near-saturated, or reaches the point where it no longer feels dry but not yet waterlogged, due to flooding or substantial leaks, it absorbs a great deal of water. This kind of exposure often calls for cutting out and replacing large sections of drywall especially if the water got to the insulation, or the framing beyond it. And the longer drywall remains damp, the greater the potential for mold or structural failure. Prompt action is important, but not quite as important as thorough drying and a proper inspection before repair.
Sheetrock Water Damage Repair: Patch or Replace?
When it comes to sheetrock (also known as drywall), whether you should patch it or replace it will depend on where the damage is and how large it is. Small water spots or slight bubbling can usually be fixed with patching compound and paint. But normally, sodden, cracked, or moldy sheetrock must be cut away and replaced. This decision is dependent on how far the water has seeped and whether the core has been breached.
Fixing Water Damaged Drywall in Ceilings
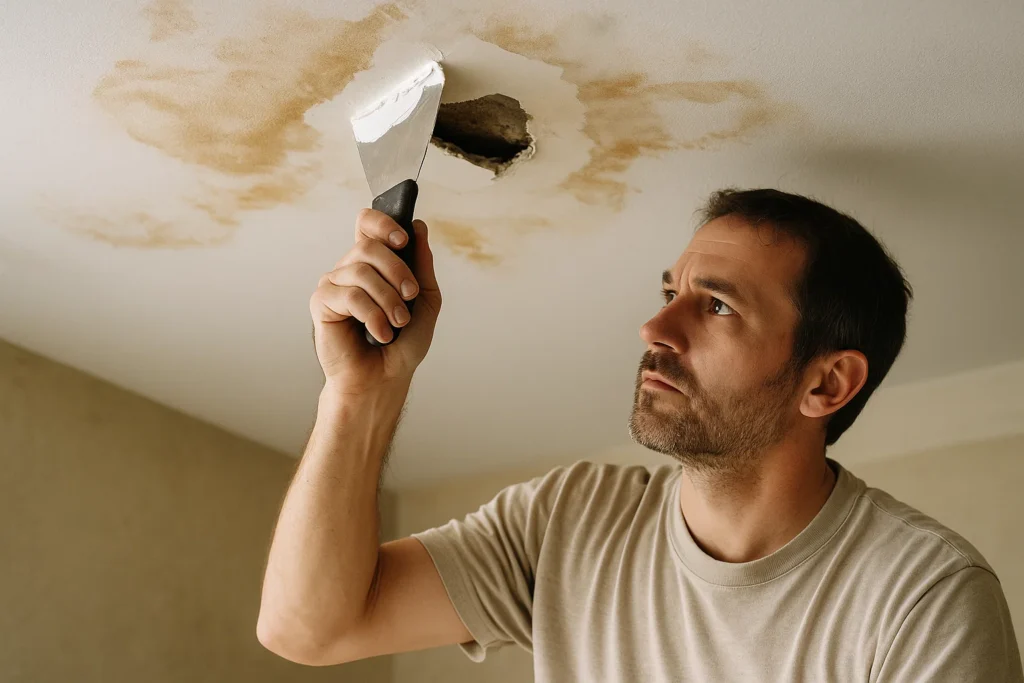
Leaks from roofs, pipes and upper-floor bathrooms often find their way into ceiling drywall. From the ceiling One of the biggest dangers with ceilings is the risk of falling debris, which is why even minor sag or discoloration is cause for immediate concern. Ceiling Drywall Repair Additional precautions should be taken when repairing ceiling drywall because of overhead work and gravity. You might have to cut out entire panels or patch small sections, depending on the damage, but always be sure to properly support and protect the ceiling first.
Professional vs. DIY: When to Call an Expert
Although many homeowners can deal with small drywall repairs on their own, there are some circumstances that require professional help. If you’re dealing with black mold, extensive water saturation or structural issues behind the drywall, a licensed contractor (or even a mold remediation specialist) should be hired (we have a guide for that), since pros help make sure the job meets building codes and health standards, particularly after major flooding or when insulation and electrical wires are involved. Understanding when to call for help can save both your home and your health.
Conclusion
Knowing how to repair water damaged drywall is something that every homeowner should have up their sleeve. Although some instances may be managed with a handful of tools and some basic materials, some can take some skill. But you need to be fast, get the repair right, and also avoid more damage. Always work in a well-ventilated space, and don’t forget your safety goggles and gloves when dealing with potentially hazardous products like mold and electric systems.
FAQs
Can I paint over water-damaged drywall?
Only after the area is totally dry, de-germed and patched appropriately. Paint directly over wet or untreated drywall will only result in peeling paint.
How long does drywall take to dry after water damage?
It generally takes between 24 – 72 hours depending on the severity of the damage, and the drying equipment used.
Is it necessary to replace all wet drywall?
Not always. If the drywall is damp but has not lost integrity or grown mildew, it can generally be saved once it dries out.